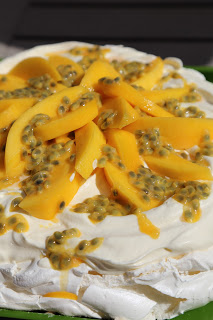
Mango and Passionfruit Pavlova


Happy Australia Day!

I'm off to an Australia Day barbie today, and looking forward to burgers loaded with beetroot, pineapple, bacon and egg - just like dad used to make. I'm not Australian! I'm a Kiwi! no not the fruit, nor the bird, but a born and bred New Zealander, and NZ's closest neighbours are Australians. We often argue, make bad jokes about each other and strive to beat each other on the sports field, but put us 14,611 kilometres away from home and we're best of friends. We share the same values, we think the same way, and by and large we eat the same food.

There are always discussions about whether Australia or New Zealand created the first Pavlova, regardless of where it came from, it is a dessert enjoyed by both Ozzies and Kiwis alike.

When I asked my favourite Australian sheila what I could bring to the barbie, there was no hesitation. PAV! she said, and I grinned...I love making a good Pav.

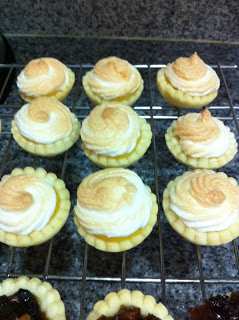
For those that haven't experienced the joy of a Pavlova, it is a meringue based dessert, crunchy and crispy on the outside and soft and marshmallowy in the middle and smothered in whipped cream and fruit of your choice. Strawberries are always a favourite, passion fruit are a nice touch, and in this case mangoes are a lovely option. I've saved my favourite fruit for last so that I can clarify a popular misnomer - the fruit is kiwifruit, k-i-w-i-F-R-U-I-T! did you get the emphasis on fruit, regardless of how they are labelled on your supermarket shelf, they are not KIWI's! A kiwi is a New Zealand flightless bird, that only exists in NZ and is one of our national icons. We can call ourselves Kiwis as a friendly colloquial term to emphasise our affinity with our home country, but we do not call kiwifruit Kiwis, unless they lay big fat eggs, run around in the dark, and squawk. Rant over.

Enjoy your Pav!

Pavlova

  • 6 egg whites
  • 1 1/4 cup caster sugar
  • 1 tablespoon cornflour
  • 1 teaspoon vanilla essence
  • 1 teaspoon white vinegar
  • 250 mls whipping cream
  • 2 teaspoons caster sugar
  • 1 teaspoon vanilla essence extra
  • 1 very ripe mango, sliced
  • pulp of 3 large passion fruit

Method

1.  Line a baking sheet with baking paper, mark out a 20cm circle on the paper. Turn the paper over so the pen or pencil doesn't get onto the meringue. Heat the oven to 100 degrees Celsius (200 degrees Fahrenheit).

2.  Whisk the egg whites until soft peaks form. Add in the caster sugar one spoon at a time. whisking well in between to dissolve the sugar. The final mixture shouldn't be gritty, if it is, beat until it is smooth. Add the cornflour, vinegar and vanilla essence and whisk to combine.


3.  Spread the meringue evenly on the baking paper to the edges of the circle. Fluff up the top to form peaks (these will crisp up).


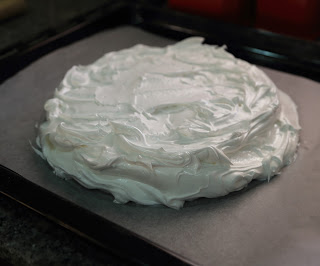
4.  Bake for 1 1/2 to 2 hours until the meringue is crisp and not moist to touch. If the meringue starts to brown, turn the oven down to 80 degrees. Turn the oven off, leave the door ajar, and leave the Pavlova in the oven until the oven is cold.


5.  Beat the cream with the sugar and vanilla essence until soft peaks form. Spread onto the Pavlova and top with fruit of your choice.

Watermelon and Pomegranate Granita


It's hot! really really hot! this week the temperature has been in the high 40's. Summer is most definately here. Friends who aren't in Doha often ask me what 50 degrees feels like - I say turn the oven on to 50 degrees, let it heat up and open the door. That's what it feels like when you head out of the door in Doha. The thing is, you get used to it and learn to spend more time indoors or at the pool. It's also a great excuse to make some cooling summer concoctions. So this week I made a tasty, vitamin and anti-oxidant rich granita with two of my favourite fruits; watermelon and pomegranate.

Granita is similar to sorbet, it's chunkier and has lots of lovely crunchy ice crystals to munch on (with sorbet you blend the frozen mixture halfway through freezing). This recipe uses Pomegranate juice which is readily available, but I prefer to make my own especially when I only need a small amount. To make 3 tablespoons of juice, pop 1/2 cup pomegranate seeds into a mesh sieve, over a bowl (to collect the juice) and smash with the back of the spoon, stirring the mushy mixture to release the juice.

The recipe is very kid friendly, but I have in the past made it for a dinner party with a splash of tequila and cointreau in it.

I have some friends who follow a mostly raw diet so if they see this , I suggest they replace the water and sugar in the recipe with 1/3 cup agave nectar, which then means it won't need heating (let me know how it turns out).

Watermelon and Pomegranate Granita
  • 1/3 cup sugar
  • 3 tablespoons pomegranate juice
  • 3 tablespoons water
  • 5 cups of watermelon, de-seeded and chopped into rough chunks
  • juice of a lime

Method
  1. Bring the sugar, pomegranate juice and water to boil stirring to dissolve the sugar, set aside to cool down.
  2. Process the watermelon and lime juice in a blender until smooth (you'll need to do this in two batches).
  3. Return all of the watermelon mixture to the blender, add the pomegranate/sugar mixture and blend well. Pass through a fine mesh sieve to remove any lumps, and pour into a 20cm by 30cm oblong glass or ceramic dish.
  4. Put into the freezer and every 30 minutes, stir and scrap the mixture with a fork. After about 3 hours you will have a crumbly, crunchy granita. This will be ok covered in the freezer for 2 to 3 days. Serve garnished with some extra pomegranate seeds.

Layered Raspberry and Lemon Cheesecake

Cheesecake is one of my favourite desserts, I love the creaminess of the filling, teamed with the crispy crunch of the base and a lovely tartness in the topping.

I stumbled across the fabulous The Italian Dish recently, and this week she made little cheesecakes in jars. In a previous post she also made a cheesecake parfait in glasses. I fancied a dessert last night, but didn't want to spend hours mixing and baking a cheesecake, so I followed her idea and deconstructed a no bake cheesecake and served it in jars (because how cool is that). I used fresh raspberries and loaded up the cheesecake with lemon juice, and used wholemeal digestive biscuits for the crumb mixture, and it was a little jar of decadence. It would also be fabulous with strawberries or other berry fruit. I'm going to experiment with the idea and try a caramel sauce and grated chocolate version with Baileys in the cheesecake mixture instead of lemon. Then it will definately be time to get back on that treadmill.


Layered Raspberry and Lemon Cheesecake
  • 200 grams wholemeal digestive biscuits
  • 1/4 cup melted butter
  • 400 grams cream cheese
  • 1 cup sour cream
  • 1/2 cup caster sugar
  • juice of 2 lemons
  • 400 grams raspberries
Method
  1. Crush the biscuits into crumbs using a food processor or by hand and mix with the melted butter
  2. Sprinkle the raspberries with a little sugar and mash slightly, set aside
  3. Beat the cream cheese and sugar together until smooth and creamy, add the lemon juice and sour cream and beat a bit more
  4. Put a layer of crumbs in the bottom of a jar or glass, top with some cheesecake mixture then with a spoonful of raspberries, repeat the layering until you get to the top of the jar, and finish with a sprinkling of the biscuit crumbs.

Time on my hands

I've had a lazy hazy week or two, lots on, but loads of time for cooking as well. I had a great morning outdoors at the lagoon teaching a group of lovely ladies how to cook some simple tapas - delicious chicken meatballs in sofrito sauce (basically a spanish tomato sauce loaded with smoked paprika) & eggplant, capsicum and sundried tomato rolls served with a rich garlicky coriander salsa.

I turned a glut of courgette into zucchini and tomato chutney which tastes divine (even if I say so myself), and will be fabulous in a few weeks when all the flavours have meshed together and the vegetables smoosh down into a jam-like consistency, and finally I remembered I had some lemon curd and christmas mince in the fridge, so threw together a bit of pastry, and made some bite size xmas mince pies and lemon meringue tarts (recipe below). Please excuse the photo, I only had my iphone, so the quality isn't fantastic, but it shows you how they looked and in case you're wondering - the pies were delish!


Lemon Meringue Tart
makes one medium size tart, or 24 mini tarts.

Pastry

  • 1  1/2 cups flour
  • 1/2 cup cornflour
  • 1/2 teaspoon salt
  • 1 tablespoon caster sugar
  • 180 grams cold butter, cut up
  • 1/4 cup cold water

Pop the flour, cornflour, salt and caster sugar into a food processor, add cold butter and blitz until the mixture looks like breadcrumbs. With the processor running dribble in the cold water until the pastry start to comes together, tip onto the bench and squish together into a ball, cover in plastic wrap and pop in the fridge for 30 minutes

Lemon Filling
  • 1/4 cup cornflour
  • 1 cup sugar
  • grated rind from 1 lemon
  • 1/2 cup lemon juice
  • 3/4 cup water
  • 3 eggs, separated (keep the whites for the meringue)
  • 1 tablespoon butter

Blend cornflour, sugar, eggs, lemon rind and juice together until smooth, Add water and cook in a bowl over a pot of simmering water, whisking continually until mixture thickens (about 5 minutes). Remove from heat and add in butter.

Meringue
  • 3 egg whites from above
  • 1/4 cup caster sugar
  • 1/2 teaspoon vanilla essence

Beat egg whites until stiff, beat in sugar 1 tablespoon at time, until thick and glossy, stir in vanilla essence.
And now comes the fun part - roll out the pastry to 5mm thick, Line a 20 cm pie plate, trim off excess pastry and bake blind (pop baking parchment on the pastry and fill with rice) at 190 degrees celsius for 20 minutes. Pour lemon filling into the pie base, and spoon meringue filling over the top. Return to oven and bake for 10 minutes until meringue is golden.
(for mini tarts, cut out circles of pastry, pop into mini muffin pans, prick all over with a fork and bake for 5 minutes, before adding filling and meringue)